
The cuffs can be rolled up to modify the thickness. At the hem, there's a drawstring that helps form a fluffy silhouette.
Sketch

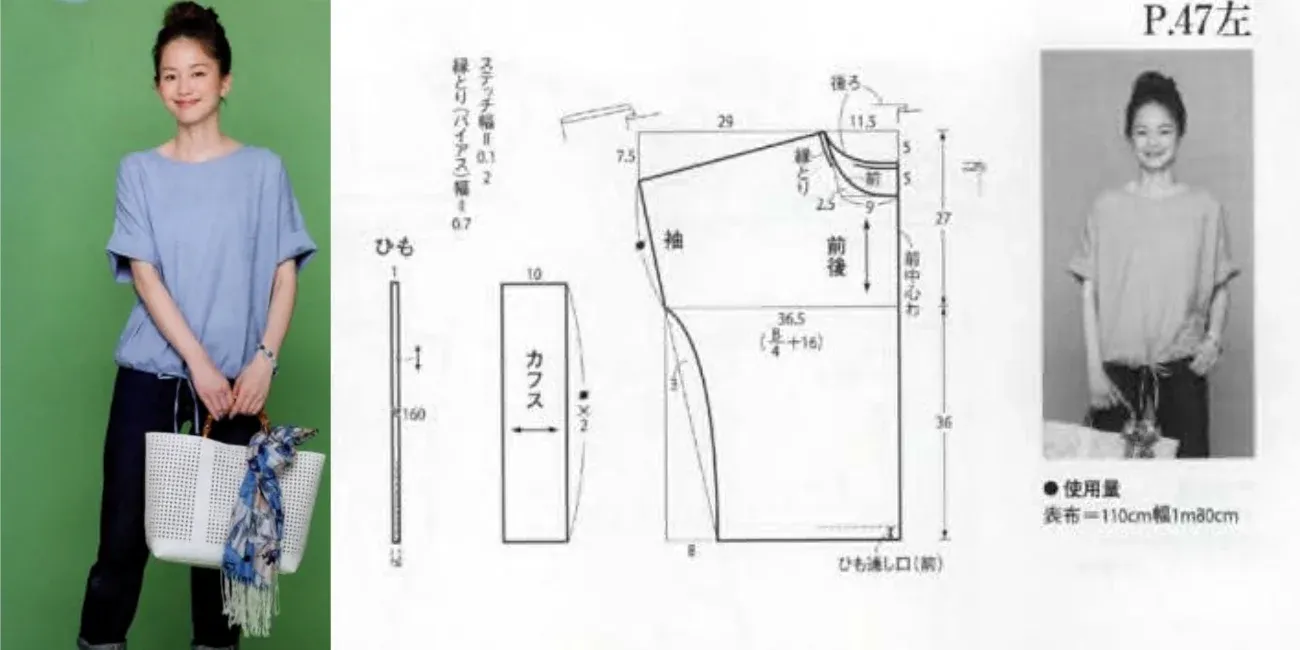
Measuremets
Body measurements

The sewing patterns are based on UK sizes.
Garment measurements

Recommended fabrics and consumption
Fabric: cotton, viscose, light and flowing materials.
Consumption: to determine the amount of 1.5 m wide fabric (the most commonly available width) needed for a blouse, you will need twice the length of the blouse, plus seam allowances. Check the "Garment measurements chart" and take the "Back Length" (1) measurement plus 4.5 cm (seam allowances) and multiply by two to get the length of fabric needed.
Patterns instructions

The patterns are given with seam allowances. They are marked with a double outline. Sometimes a 3rd line appears, it represents the sewing line.
1 Back x 1 on bending fabric;
2 Front x 1 on bending fabric;
3 Cuff x 2, y flip;
4 Cord hem x 1 on bending fabric;
5 4 cm wide bias tape (for finishing the neckline).
Cut out the product parts according to the specification. Arrange the pattern pieces on the fabric, securing them with pins or weights to keep them steady. With a pair of sharp scissors, gently cut around the outer edges of the pattern. Be patient to achieve accurate and clean cuts, as this will influence the fit and appearance of the finished garment.
After cutting, do not throw away the patterns. They will be used as templates for marking various guide points (if applicable. Ex: marking a dart tip, hem line, etc.).
Be sure to transfer all notches and other design elements like darts, pleats, and draw marks from the pattern pieces onto your fabric. While sewing the garment, make sure to align the notches correctly; they need to match up.

Sewing instructions
Step 1: Overcast the front and back parts (shoulder lines and sides).
Step 2: Sew the buttonholes on the front section where the cord will exit the hem (see the markings on the pattern).
Step 3: Sew the garment along the both sides an shoulders lines.
Step 4: Sew the cuff on the side. Iron the seam.
Step 5: Getting the cuff ready to attach to the blouse. Using the template and chalk, outline the seam allowances and the center of the cuff on the fabric's wrong side. With the help of an iron, press one of the seam allowance along the 1 line you marked earlier, ensuring that the line stays hidden within the fold. Now, fold the cuff in half, again making sure that the line is tucked away inside the fold.
Step 6: Attach the cuff to the blouse. First, turn the blouse inside out. Position the unfolded part of the cuff, which has the seam allowance marked with chalk, over the blouse, ensuring the markings are visible. Pin it in place for precision and sew, making sure to closely follow the marked line. Iron the seam allowance, ensuring that the allowances are oriented towards the inside of the cuff. Flip the blouse to its right side of the fabric for the next step.
Step 7: If the steps were executed properly, you should now see the cuff with the seam allowance folded inward and towards the front of the blouse. Secure the cuff using a 1NDL at 0.2cm from edge. The fact that the cuff was also folded in half can now serve as a helpful guide to ensure that the two halves overlap seamlessly. And if it’s not perfect, that’s okay; we’ll have a neat basting stitch of 0.2 mm on the front of the blouse. Had the cuff been attached to the front of the fabric initially, it would have been challenging to achieve an even seam.
Step 8: Stitch the hem of the blouse. To simplify the process, preform the hem with an iron. Use the pattern to mark the hem width and allowance. This will assist you in executing the hem precisely.
Step 9: Sew the 1cm piping in shell fabric at the neckline. Using a piping applicator makes the process easy. If you don't have one, it may be a bit more challenging, but it's still doable. Start by applying the piping tape to the fabric's back. Next, iron the seam. Then, fold the unsewn seam allowance back with the iron. Position the product on the right side of the fabric and sew 1NDL topstitching at 0.1-0.2cm from the edge of the piping.
Step 10: Making the cord for hem. Fold your fabric in half lengthwise with the right sides facing each other. This creates a neat line for our next pressing. After that, take each of the outer edges and fold them into the pressed line in the center, then press again. Next, fold it so that the two outer folded edges come together. Ensure that the edges align perfectly, then press. This step is crucial for making the drawstring cord flat. Finally, head over to your sewing machine and stitch the two folded edges together right along the edge. I prefer to use my edgestitch foot and shift the needle 2-3 positions to the left. This results in a nice, even stitch along the edge.
Step 11: Use a safety pin to insert the codon through the hem. At the ends of the cord, we can make some knots to make the ends look better.
Inspired by...
Press download and wait for the timer to reach 0.
Pdf paper format is A0. To print A4 at your personal printer, use the settings needed for that.
Comments
Post a Comment